Build a contraption: Arm lifter
In the example below, I'll show you how to build an arm that detects when boxes arrive, then lifts them higher in the scene, depositing them onto another arm lifter, or a track. You can daisy-chain as many of these as you want. Since they are triggered (as opposed to moving automatically), they will wait until activated to move.
The first thing we want to do is sketch out what we want the arm lifter to look like. Here's a picture of what I have in mind:

How do you construct this?
First, open a text editor like notepad. Put this at the top:
contraption
All contraptions MUST begin with contraption at the top. Without it, Marble Run Maker will not recognize it.
Now we want to define the shape. Let's start with the body:
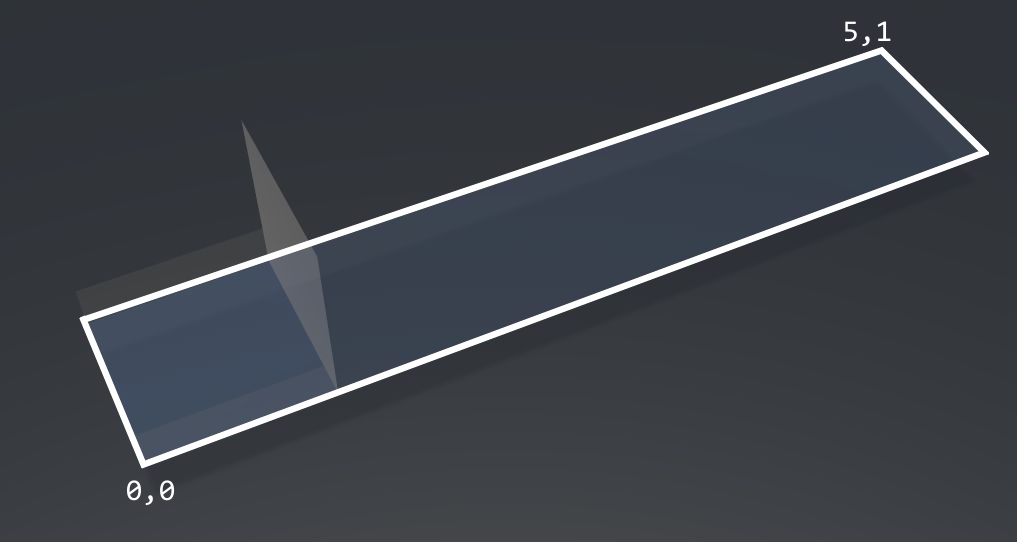
Now, add the word "shape" underneath contraption, and put the corners of your contraption. Marble Run Maker is smart enough to know that you're drawing a rectangle, with 0,0 and 5,1 as opposite corners.
contraption
shape
0,0 to 5,1
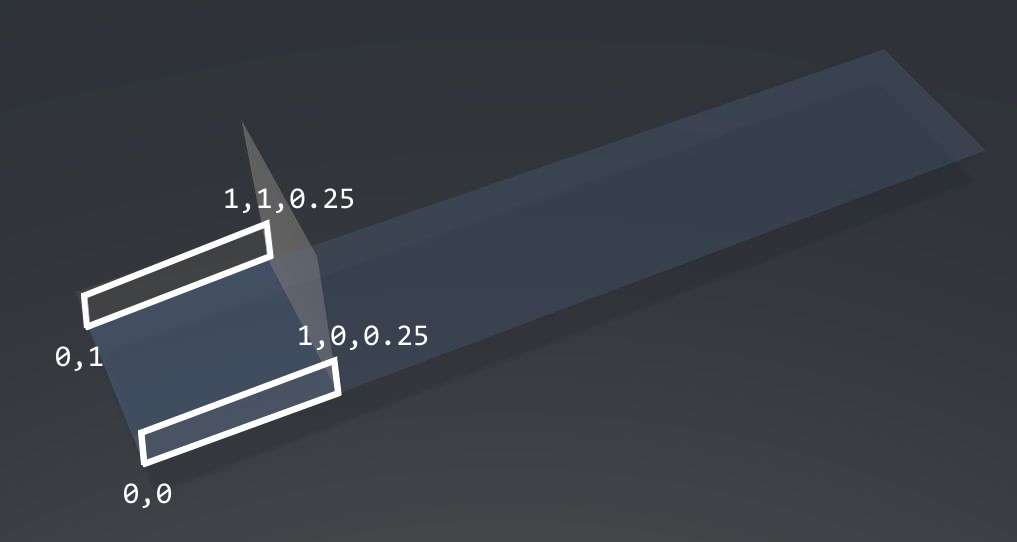
Now let's get the coordinates for the vertical blocker. Since this arm is going to rotate clockwise along the far right end, in a full circle, this blocker will keep the box from sliding down the arm. Here's the coordinates we want to get:

Again, Marble Run Maker knows that when you provide only two sets of coordinates, you're giving the opposite corners of a plane. In this case, the plane runs from 1,0 -- one to the right on the X axis, and 0 forward on the Y axis. The second coordinate is 1,1,1. You'll notice that we provide a Z value here -- that is, vertically up 1 in the scene. Why, you may ask, did we not provide the Z coordinates for the other coordinates we've already drawn? The answer is: we didn't have to because they are 0. If you omit the Z, Marble Run Maker assumes that it's 0.
Last, we need to add the side walls. These walls will keep the box firmly in place so that it doesn't slide off the sides while getting lifted.
Now we're done describing the shape. Here's what your code looks like thus far:
contraption
shape
0,0 to 5,1
1,0 to 1,1,1
0,0 to 1,0,0.25
0,1 to 1,1,0.25
Of course, if you copy the above code from Notepad to the clipboard (select it, then press Control-C), you can have fun plopping this dumb thing down all day long. Just press P, for New Contraption. It won't do anything except obstruct balls and boxes in your scene. But at least you know it works:
You will note, however, that a box slides nicely into place, as it should. See here:
Now let's make the dumb thing move. It's easy: you just have to tell Marble Run Maker first that you want movement. How? Easy: movement, as shown here:
contraption
shape
0,0 to 5,1
1,0 to 1,1,1
0,0 to 1,0,0.25
0,1 to 1,1,0.25

movement
You don't have to put the space before the word "movement" unless you want to. I'll do it for clarity.
There are two kinds of movement in Marble Run Maker: slide and rotate. We want rotate.
We need to tell Marble Run Maker three things about the rotation: the origin, the axis and the angle.
Origin: this is the point around which the rotation occurs. In our arm lifter, we want this on the right-side end, at 5,0,0.
Axis: we want the arm to rotate in a circle the rises off the ground, back down, into the ground, and back to where it started. The axis is not a point, but a vector -- that is, imagine an arrow sticking out of the origin point, 0,0,0, in 3D space. If we set the axis to 0,0,1, that arrow sticks straight up in the air, and things will rotate around it. If we used that as our axis, our arm lifter would rotate around in a circle parallel to the ground -- not what we want. Instead, we want the axis 0,1,0. This axis points forward, along the Y axis. The arm lifter will properly rotate around the Y axis, in a circle, just like the hands of a clock on the wall.
Angle: This one's easy: 360. But it's negative because we want it to go clockwise. If you're like us, you'll put in positive 360 the first time, see that it's going the wrong way, then put the negative in place. High school geometry be like that.
Here's the code thus far:
contraption
shape
0,0 to 5,1
1,0 to 1,1,1
0,0 to 1,0,0.25
0,1 to 1,1,0.25

movement
rotate
origin>5,0,0
axis>0,1,0
angle>-360
Now run it:
Pretty neat. It's not what we want exactly, but you can play with it. Here's me trying to drop a box in the right spot so the arm lifter will pick it up. It works, but then gets haphazardly tossed to the side. You may be able to make this work if you build a holder at the bottom that keeps a box in place until the arm comes swinging through blindly on the next pass. But it's not elegant. Here's what that looks like:
Trigger
We can improve this arm lifter by having it wait patiently at the start position until a box arrives. We can do this using a trigger. A trigger is a small shape you draw on the contraption that, when it comes in contact with something (like a ball, box, or a contraption), tells another part of your contraption to start moving. Triggers are visible, but they have no substance to them -- objects can pass right through them.
Let's put a trigger smack dab in the middle of the box holder part of the arm:
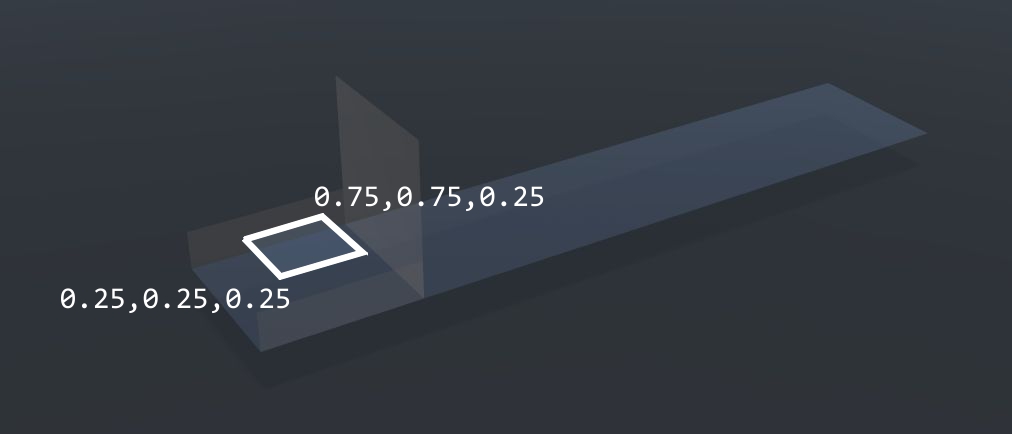
The coordinates should make sense to you now: The bottom left corner is 0.25, 0.25, 0.25. This means that it's 0.25 to the right along the X axis, 0.25 forward along the Y axis, and raised off the ground by 0.25. The top right corner is 0.75, 0.75, 0.25. Raising it off the ground a little bit ensures that a box that comes sliding in will definitely hit it. Centering it in the middle of the box-holding portion of the arm lifter ensures that the box is at least partially on the arm before triggering the arm lifter to start moving. If we had placed the trigger's left-most part at X=0, the arm lifter may very well blast off without the box in place, failing to pick up the box and just flipping it around.
The code for the lifter should look familiar, with one addition: we've explicity said that its type is "trigger." (As a side note, we could have given the arm lifter a type called "track" in its code description above, but we eliminated it because it's the default; if you don't specify a type, "track" is assumed.
type
trigger

shape
0.25,0.25,0.25 to 0.75,0.75,0.25
Now we have two distinct parts of our contraption: the arm lifter, and its trigger. Since they both go into the same contraption script, it's useful to separate them by giving them each a name. Names are important because the trigger has to know who it's supposed to call when a box or ball arrives. So let's bring the two pieces of code together into one, giving each one a simple name:
contraption

name
armlifter
shape
0,0 to 5,1
1,0 to 1,1,1
0,0 to 1,0,0.25
0,1 to 1,1,0.25
movement
rotate
origin>5,0,0
axis>0,1,0
angle>-360

name
thetrigger
type
trigger
shape
0.25,0.25,0.25 to 0.75,0.75,0.25
Link the lifter and trigger
Finally, lets link the armlifter and its trigger.
Armlifter gets a snippet called activationmethod, which is "trigger." By default, activationmethod is "autostart." If you don't have an activationmethod section, "autostart" is assumed, and the movement code, if present, takes off and runs automatically.
The trigger gets a snippet of code called triggerthisname for calling "armlifter."
Here's the complete code, ready for you to use:
contraption

name
armlifter
activationmethod
trigger
shape
0,0 to 5,1
1,0 to 1,1,1
0,0 to 1,0,0.25
0,1 to 1,1,0.25
movement
rotate
origin>5,0,0
axis>0,1,0
angle>-360

name
thetrigger
type
trigger
shape
0.25,0.25,0.25 to 0.75,0.75,0.25
triggerthisname
armlifter
Connecting everything
Here's the lifter above, which you just build by hand, with a pause built in, and different speeds of rotation for different parts of the movement. This change allows you to have multiple contraptions work hand in hand with each other. The entire scene -- including the above contraption code, slightly modified -- is here.
Advanced scripting
- You can build in
pausecommands, to tell the motion to stop for a certain length of time. You can change the speed ofrotationandslide. - You can rekindle parts of your contraption, causing parts to regenerate at key points in the movement -- either a certain distance or time. This lets you create bucket lifters, ferris wheels and multi-part contraptions without having to code each duplicated part individually.
- You can have the
movementscript destroy the contraption at the end, and return it to its original location, or continue on infinitely, applying the same motion commands to the contraption no matter where it ends up after the motion string. - You can have certain rotations and movement happen only once, useful if you build, say, a pinball machine, and want to tilt the entire board 20 degrees and have it stay there.
- Triggers can be programmed to react to any combination of any color of balls and boxes: white balls only, for example, or any green box or ball.
- Triggers can be programmed to react to contact with another contraption. This lets you construct elaborate filtering and chain reaction systems, like airport luggage sorters.
- You can build complex contraptions using SketchUp or Blender and import them into Marble Run Maker, adding custom movement to complex 3D shapes.